Saturday, December 19, 2009

Finally Finished

At 6 in morning, after having gotten breakfast at McDonald's, and not having gone to bed yet, we finished with peggy plan b, brought Simon over, and marveled in our craft.


Rachel still fit perfectly in his cold metallic arms.


So after having had slept for a couple hours, we rejoined forces to finish putting Simon together, and to install him in all of his glory in the gallery.  John took this picture, and I still feel like we build a sacrificial alien alter.  I don't see the correlation between this, and the robotic creature we intended to make people happy with.


In presentation, Simon did not move, had a limited color mixing display on his belly, didn't talk, didn't nod, didn't tweet, didn't make you warm, didn't harvest energy from the sun, didn't nothin.

Basically Simon was our dumbsurface, our "Downs Surface" as Eric liked to say.  He was far more complex than we could have ever guessed, especially when it came down to trying to get the camera to talk to the motors or the aruino, and fighting with Peggy for days.  I think we're fortunate it didn't collapse under it's own weight, the steel brackets Eric put in (I helped) really made a difference on the stability front.


When we presented, one of our guests, who was more than skeptical of all of the projects, and voiced his skepticism quite thoroughly, pointed out that our surface did essentially nothing, and he would never consider our project a success.  While I agree, in what we set out to do, we really didn't accomplish any of "Sustainability for happiness" goals, but the project wasn't a waste of time and money.  I didn't sleep three hours a night for three weeks, and struggle to keep up in my other classes because I was focusing almost singly on this project, to not feel like something was gained.

We made a 6 foot tall robot, who, until five minutes before we presented, did in fact move.  For proof, please view this video.  Rachel and I were definitely making embarrassingly excited noises


Peggy just would not cooperate

I want to take a few moments to talk about Peggy. I spent most of my life for two weeks soldering LEDs to pixel boards, ethernet cables to pixel boards, and ethernet cable to the main LED board.  Then we discovered that the board didn't behave the way it was supposed to.  Entire sections of the board weren't lighting up the LEDs, and the ones that did were not behaving in the manner they were supposed to.

So?


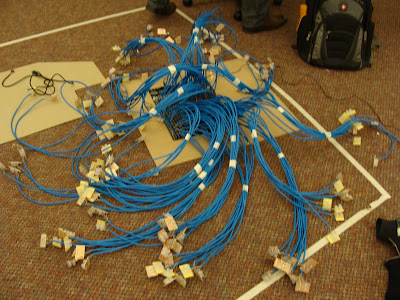
We spent ~$260, we were dead set on making Peggy do her job.  We separated the cables into groupings of rows from top to bottom.


Peggy looked like a terrifying creating creature from the deepest and coldest crevices of the sea floor.


Turns out it was still far too difficult to understand what was happening on the board, Rachel and I tested pixels through the board, and began mapping out which LEDs worked, where connections were poor, and just trying to get a general idea of where things were going wrong.  Then Z said the forums discouraged our method, and asked that we put up the LEDs in the same mapping as the board itself.  So we did, for two hours.

Peggy gets more and more intimidating with every moment.  We ordered a chip replacement kit, but we discovered the damage was in the board itself, the causes are a little uncertain, but may have had something to do with chips being put in in the reverse locations as where they should have been.

So Eric came up with a brilliant plan- replace Peggy with copper tape, some transistors, and wire up the LEDs so we light up all of the LEDs of one color at a time, instead of the intelligent pixels we had hoped for.


So, we put it together, some copper tape, some wires, and a handful of transistors


We held it together with my handy electrical tape.


And hated Peggy plan B just as  much as Peggy.  But, she worked!

Gears gears gear gears

In order to make Simon move, Eric and I had to make sure that the drive system we (mostly him, I'm terrible at these things, I think I was more company than helpful) designed actually worked.


After the gears were water jetted and welded to the brackets, or put onto the driveshaft, we realized something terrible had happened.

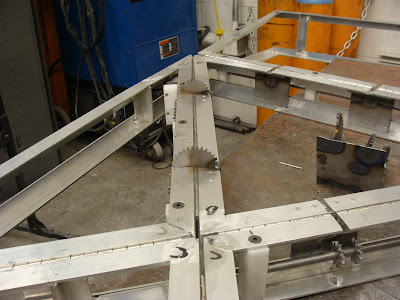
None of the gears meshed


You can clearly see how far apart the gears are.  As it turns out, regardless of how perfect your digital simulation/design is, the physical manifestation of your system will not be perfect, especially when a majority of the dimensions are determined by the human factor constructing it.

So we have to start over.  The gears were re-cut, this time excluding the tabs Eric had designed to help keep the gears  securely in the steel brackets (there was no way we were going to try to weld steel to aluminum).


Once the gears were re-cut, we started preparing the frame for installation and manipulation of the gearing.


After hours and hours of reseating, grinding, fidgeting, and more grinding, we got each of the gears to mesh.


Then we welded everything in place, and by we, I mean Eric.  I learned how to MIG (Mig?) weld, but, as you can tell, my welding still needs a lot of practice.


I did have some good seams though! if you look closely you can see the two thin steel sheets look pretty nice in a few areas, and one of the four scrap gears I welded onto the thin sheets has four lovely welds, clean seams, basically everything this picture isn't.


We put that system in.


We welded that.


We made that motor flip that arm

We made Simon go, because we are rockstars